
Table of contents
- Install VirtualBox 7.1
- Configure VirtualBox
- Install Ubuntu
- Update Ubuntu
- Set Static IP
- Generate a SSH Key Pair
- Connect with OpenSSH from you local environment
- Summary
I will be using Ubuntu 24.04 LTS servers running on a Linux host with VirtualBox 7.1 to make a lab environment on my computer.
This post will cover the following:
- Installing & configuring VirtualBox
- Installing & configuring a NAT Network between
ctrlplane,node1&node2servers- NAT Network address: 10.0.2.0/24
- NAT Network default gateway: 10.0.2.2
- 3 virtual machines
- Setting also a Bridged adapter to the host for
ctrlplane,node1&node2, this is why my next post will be about Firewall management for each of them
| server | ip addr given | ram | vcpu | storage | comment |
|---|---|---|---|---|---|
| ctrlplane | 10.0.2.20 | 2GB | 2 | 25GB | Kubernetes Control Plane server |
| node1 | 10.0.2.21 | 2GB | 2 | 25GB | Kubernetes worker node 1 |
| node2 | 10.0.2.22 | 2GB | 2 | 25GB | Kubernetes worker node 2 |
In case your computer doesn’t have more than 16GB in RAM, just don’t create the node2 machine.
Install VirtualBox 7.1
To install VirtualBox depending on your machine, you must refer to their documentation.
For Mac OS just do :
brew install --cask virtualbox
You can also install VirtualBox on a server using this tutorial.
Configure VirtualBox
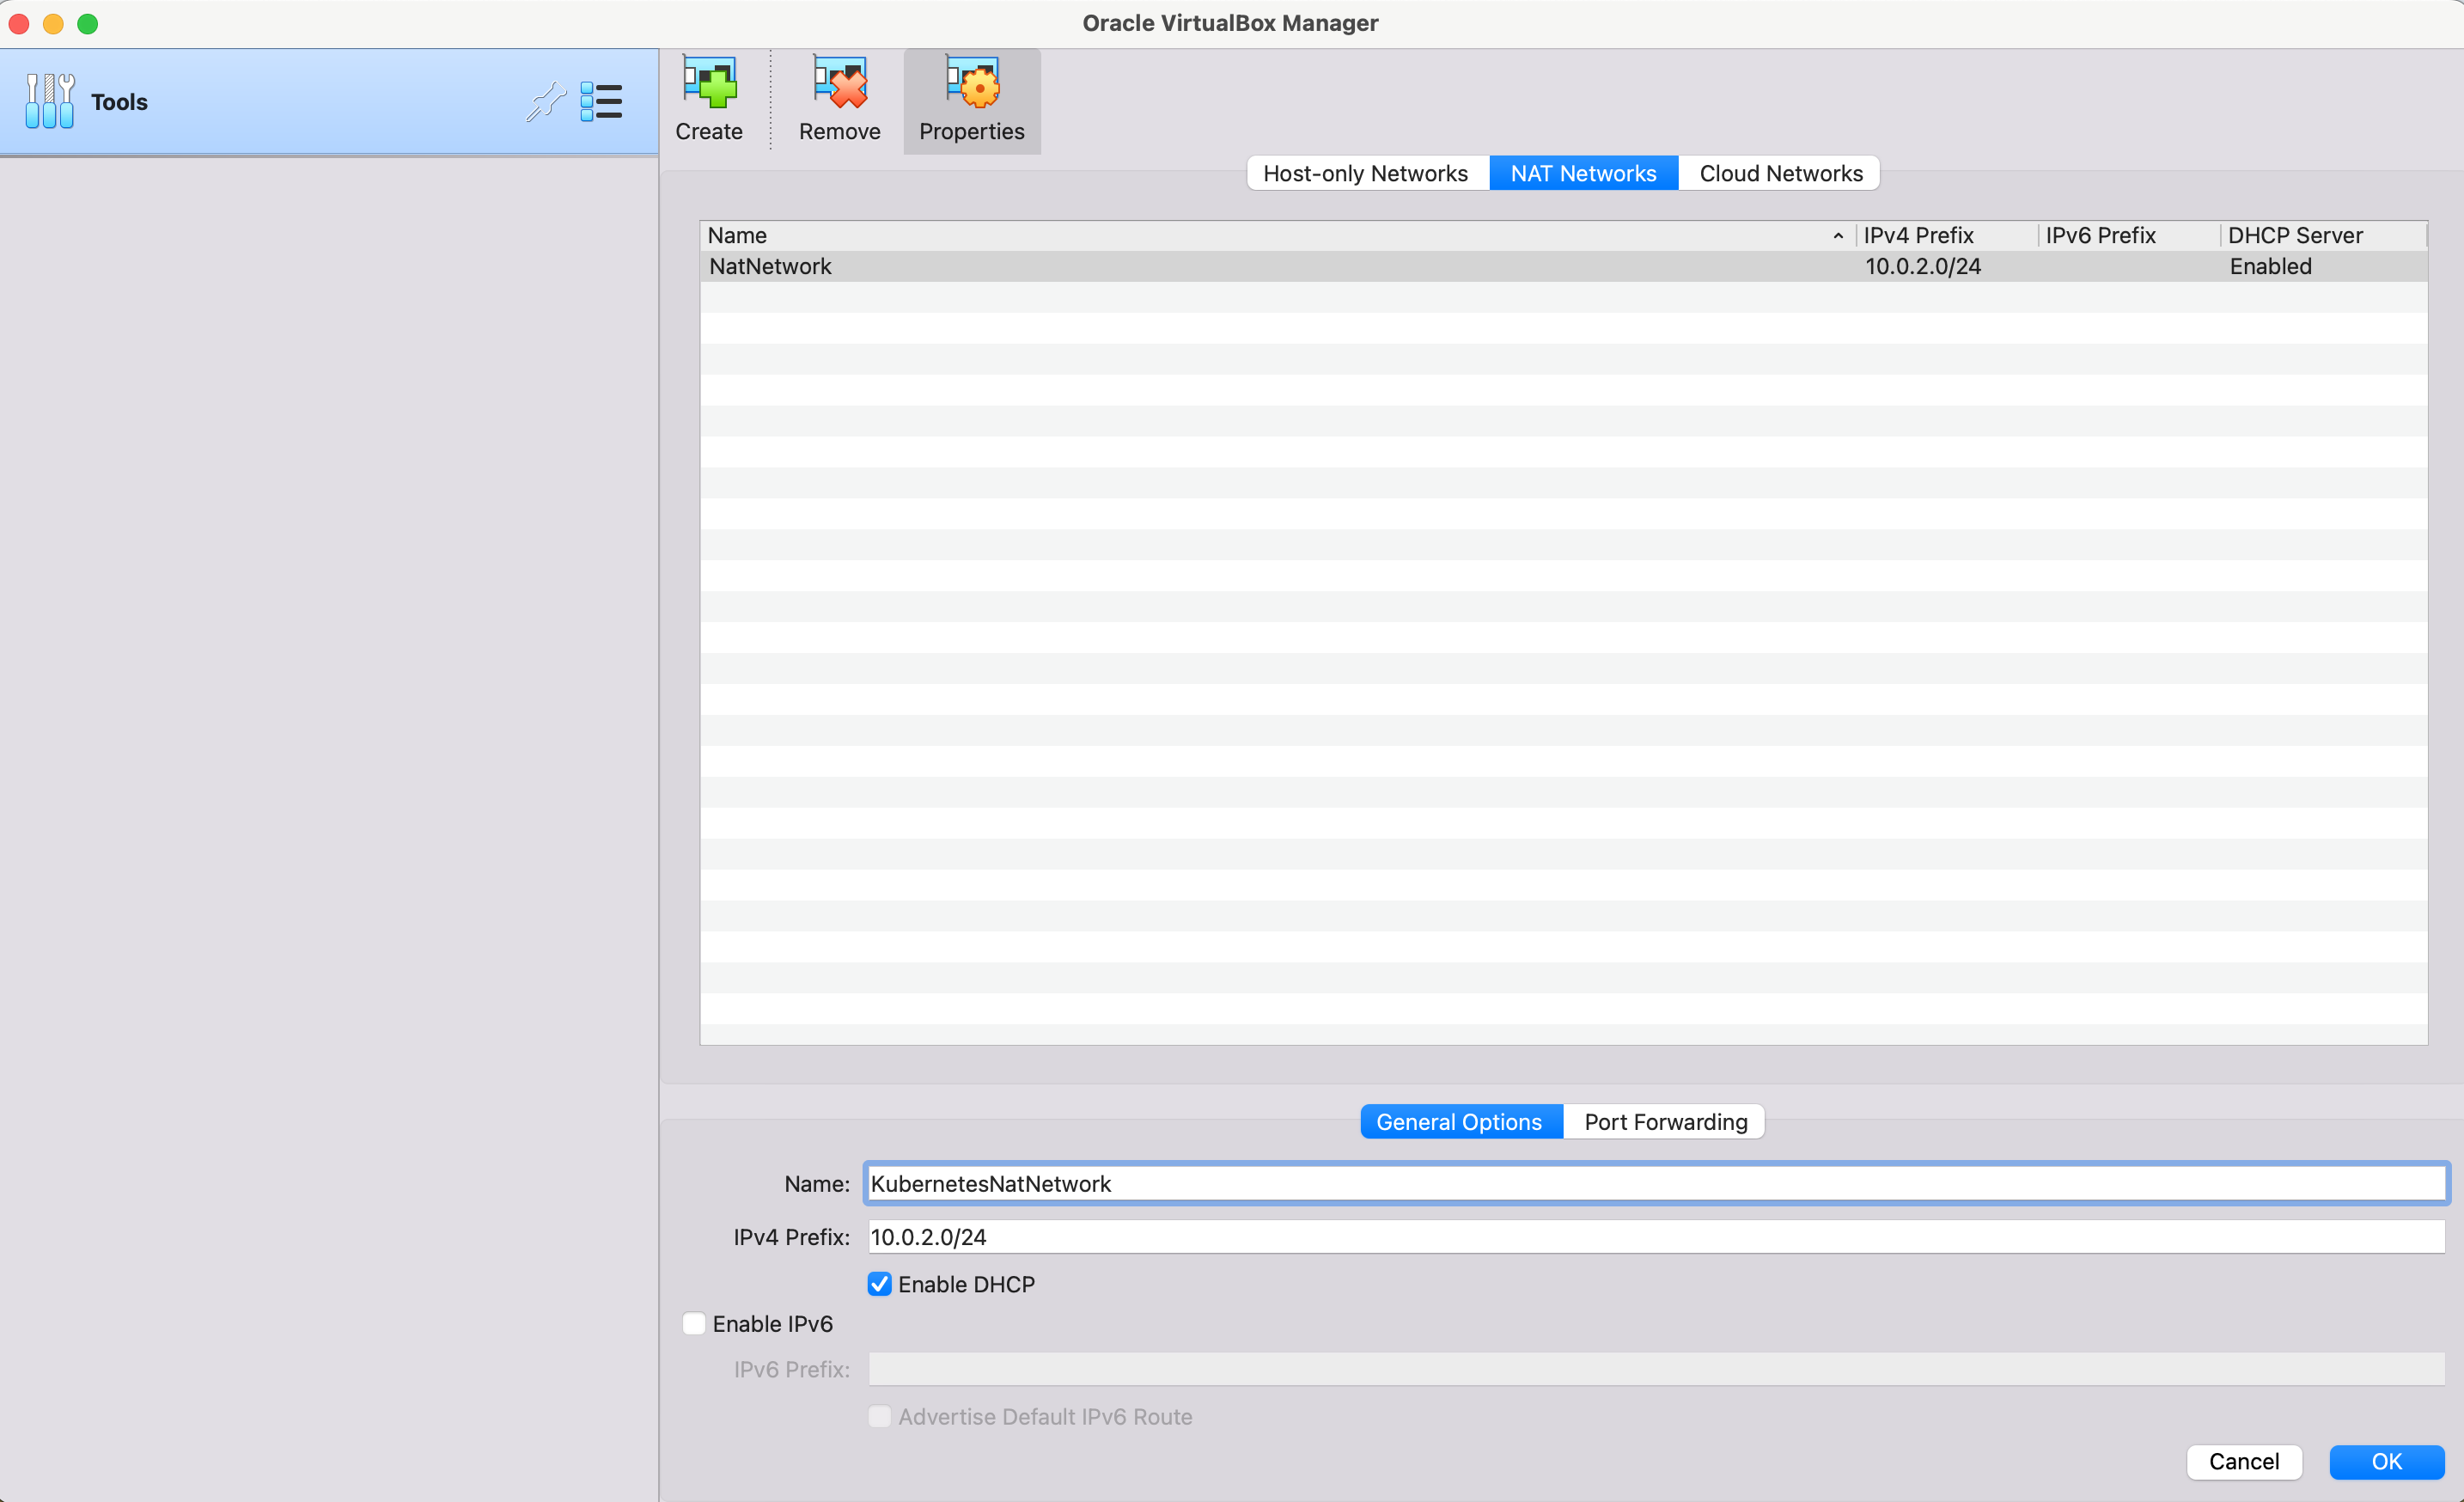
First I had to create a NAT Network by opening VirtualBox, selecting Tools > Preferences > Network. And then click the Create new NAT Network button.
I named it KubernetesNatNetwork as I plan to use it for a Kubernetes cluster.
Download the latest Ubuntu Server, at the time I am writing its version is 24.04 LTS.
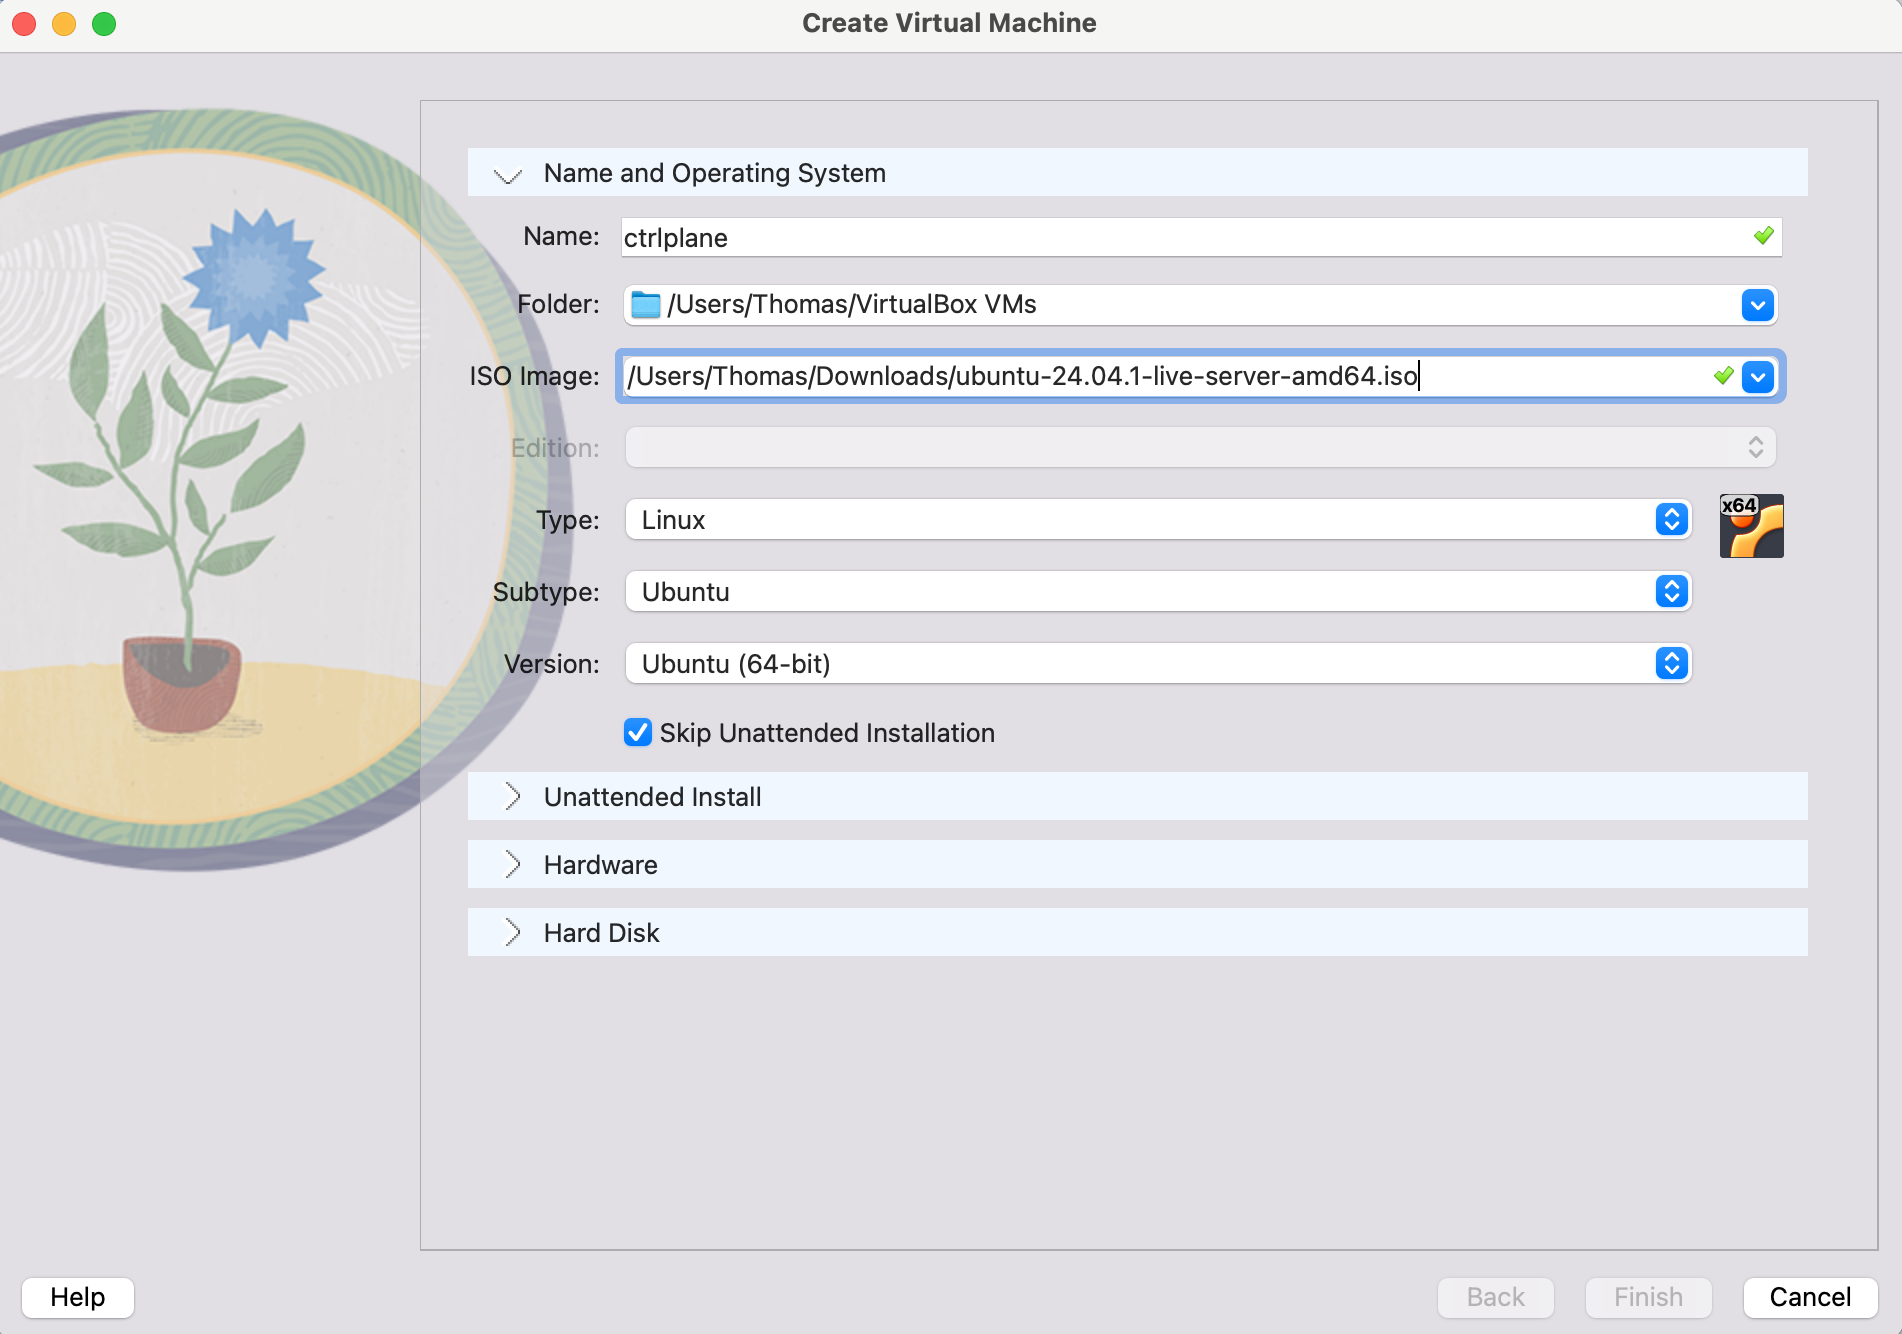
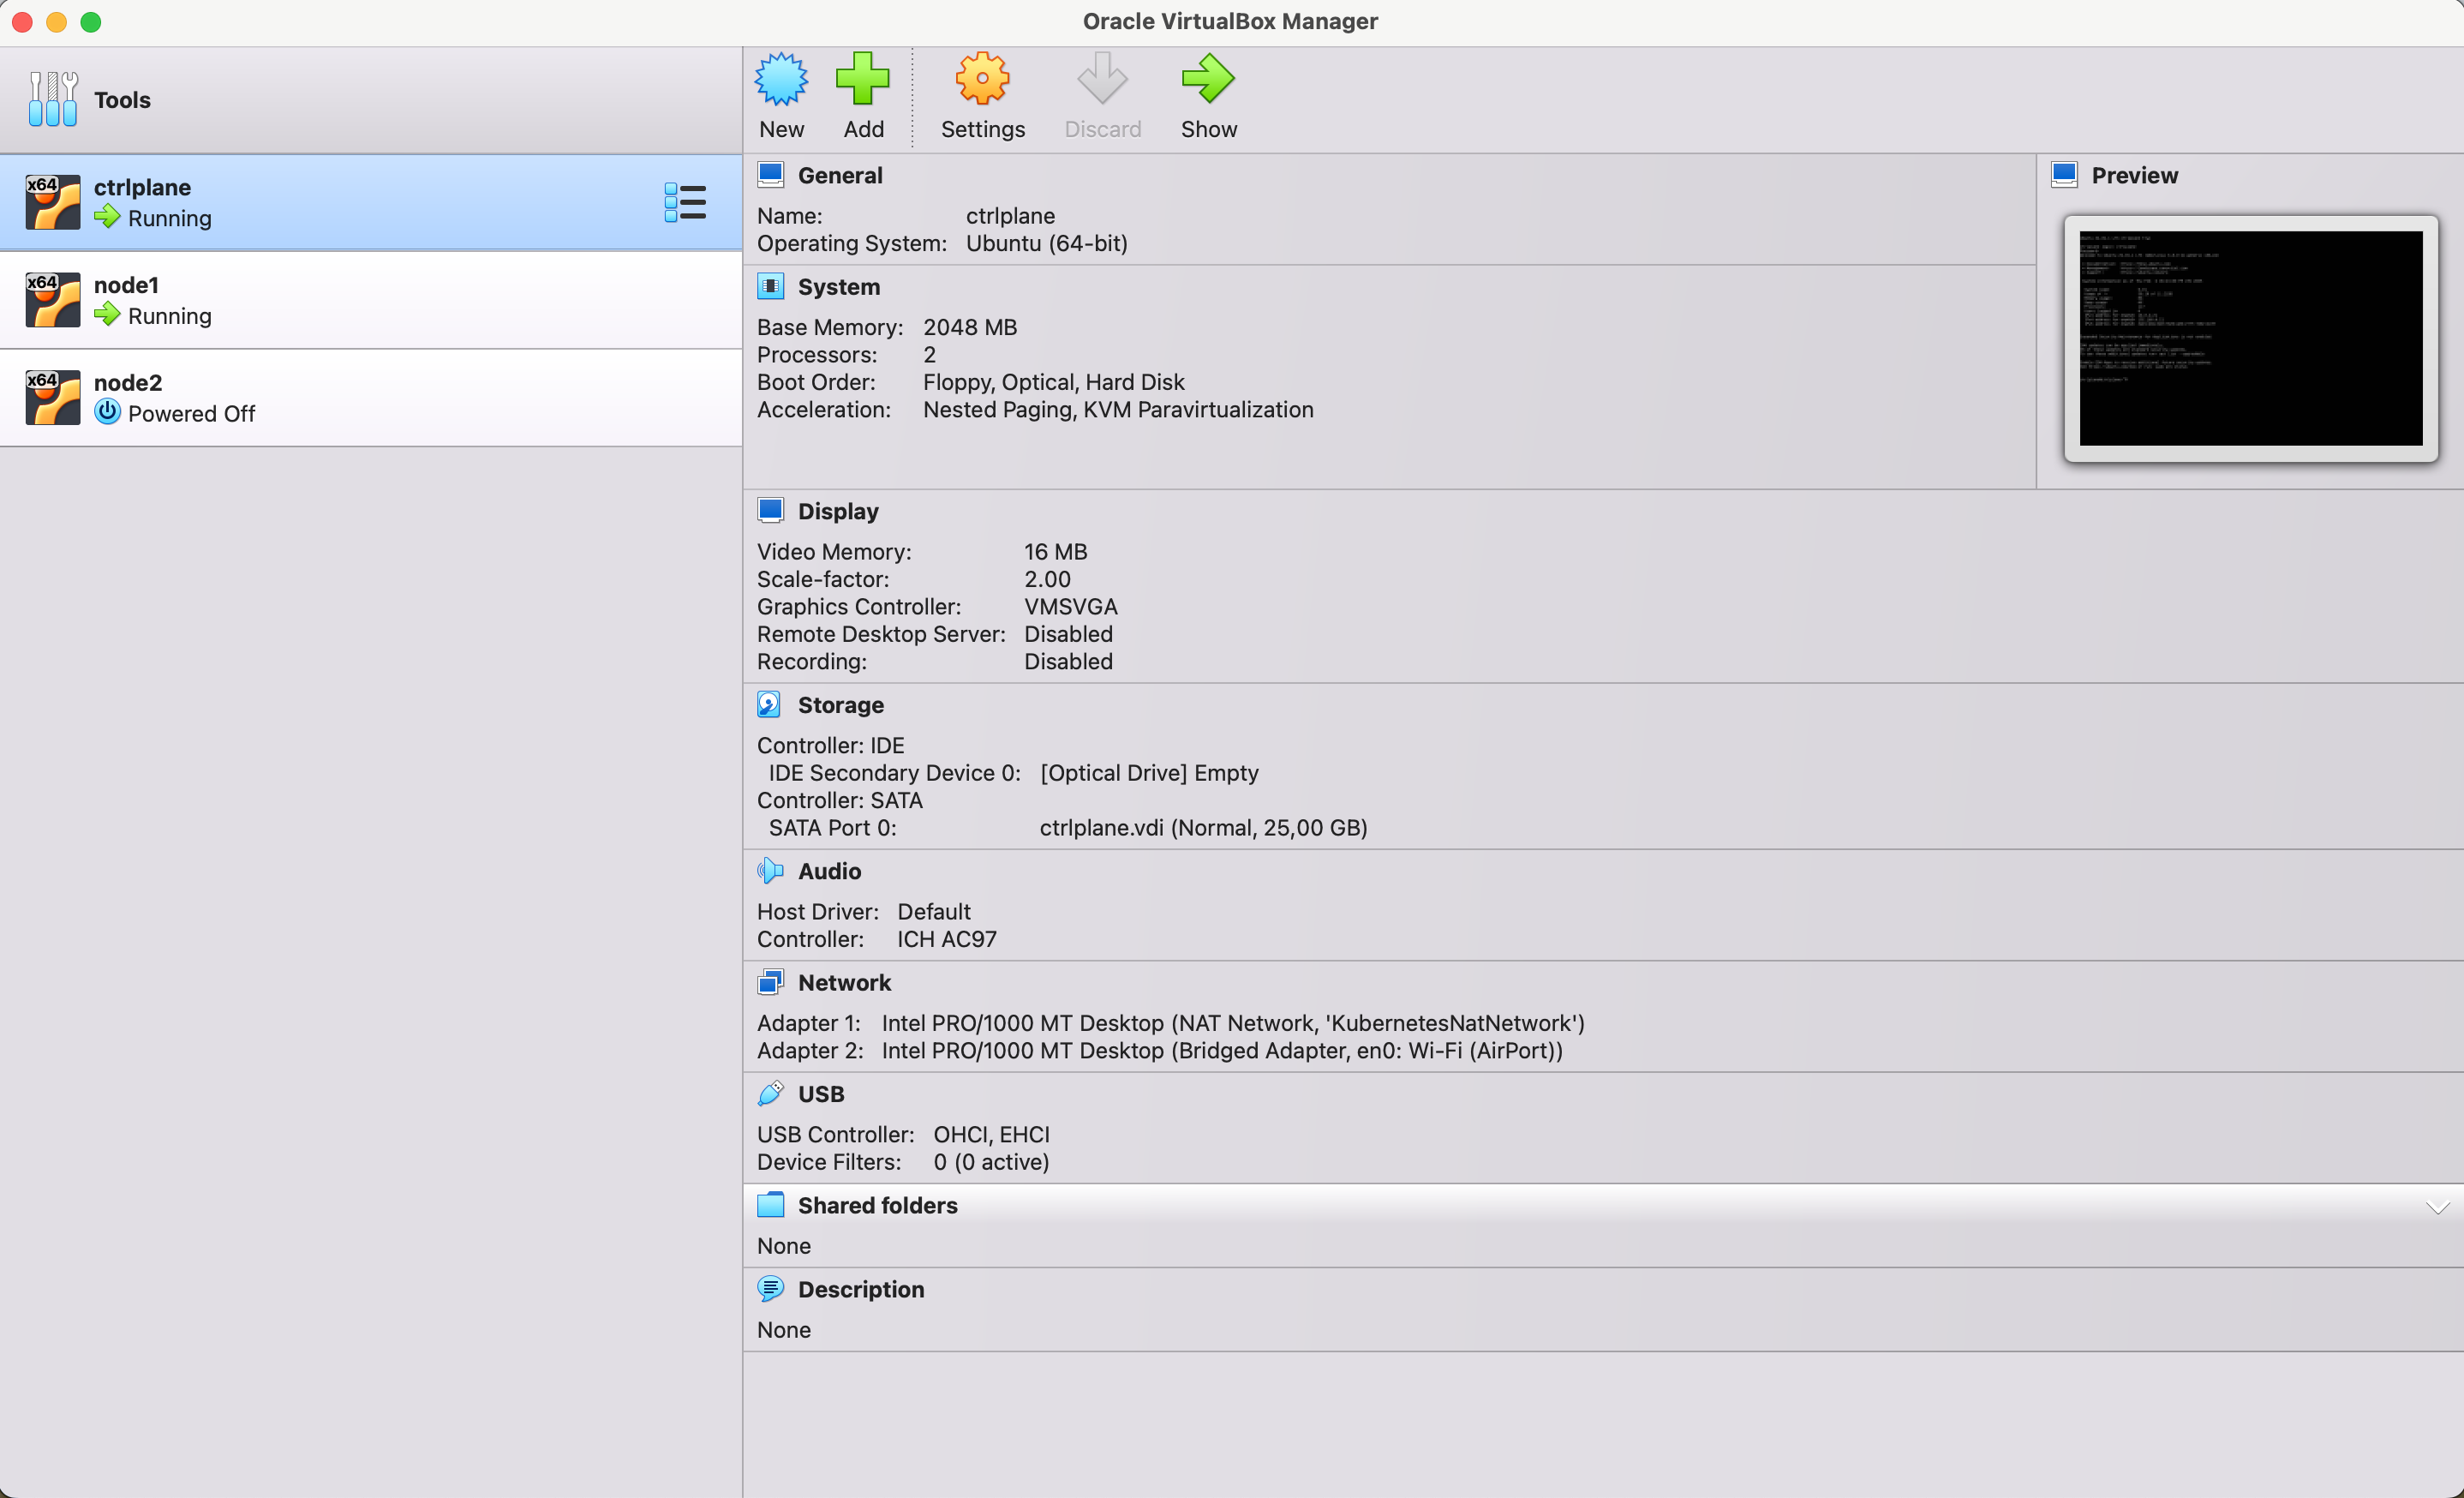
Create 3 virtual machines with the following, click the New button:
- Name:
ctrlplane,node1&node2 - Select the Ubuntu iso image
- Select Skip unattended installation
Once you have created the machines, select each one and click Settings > Network > Adapter 1.
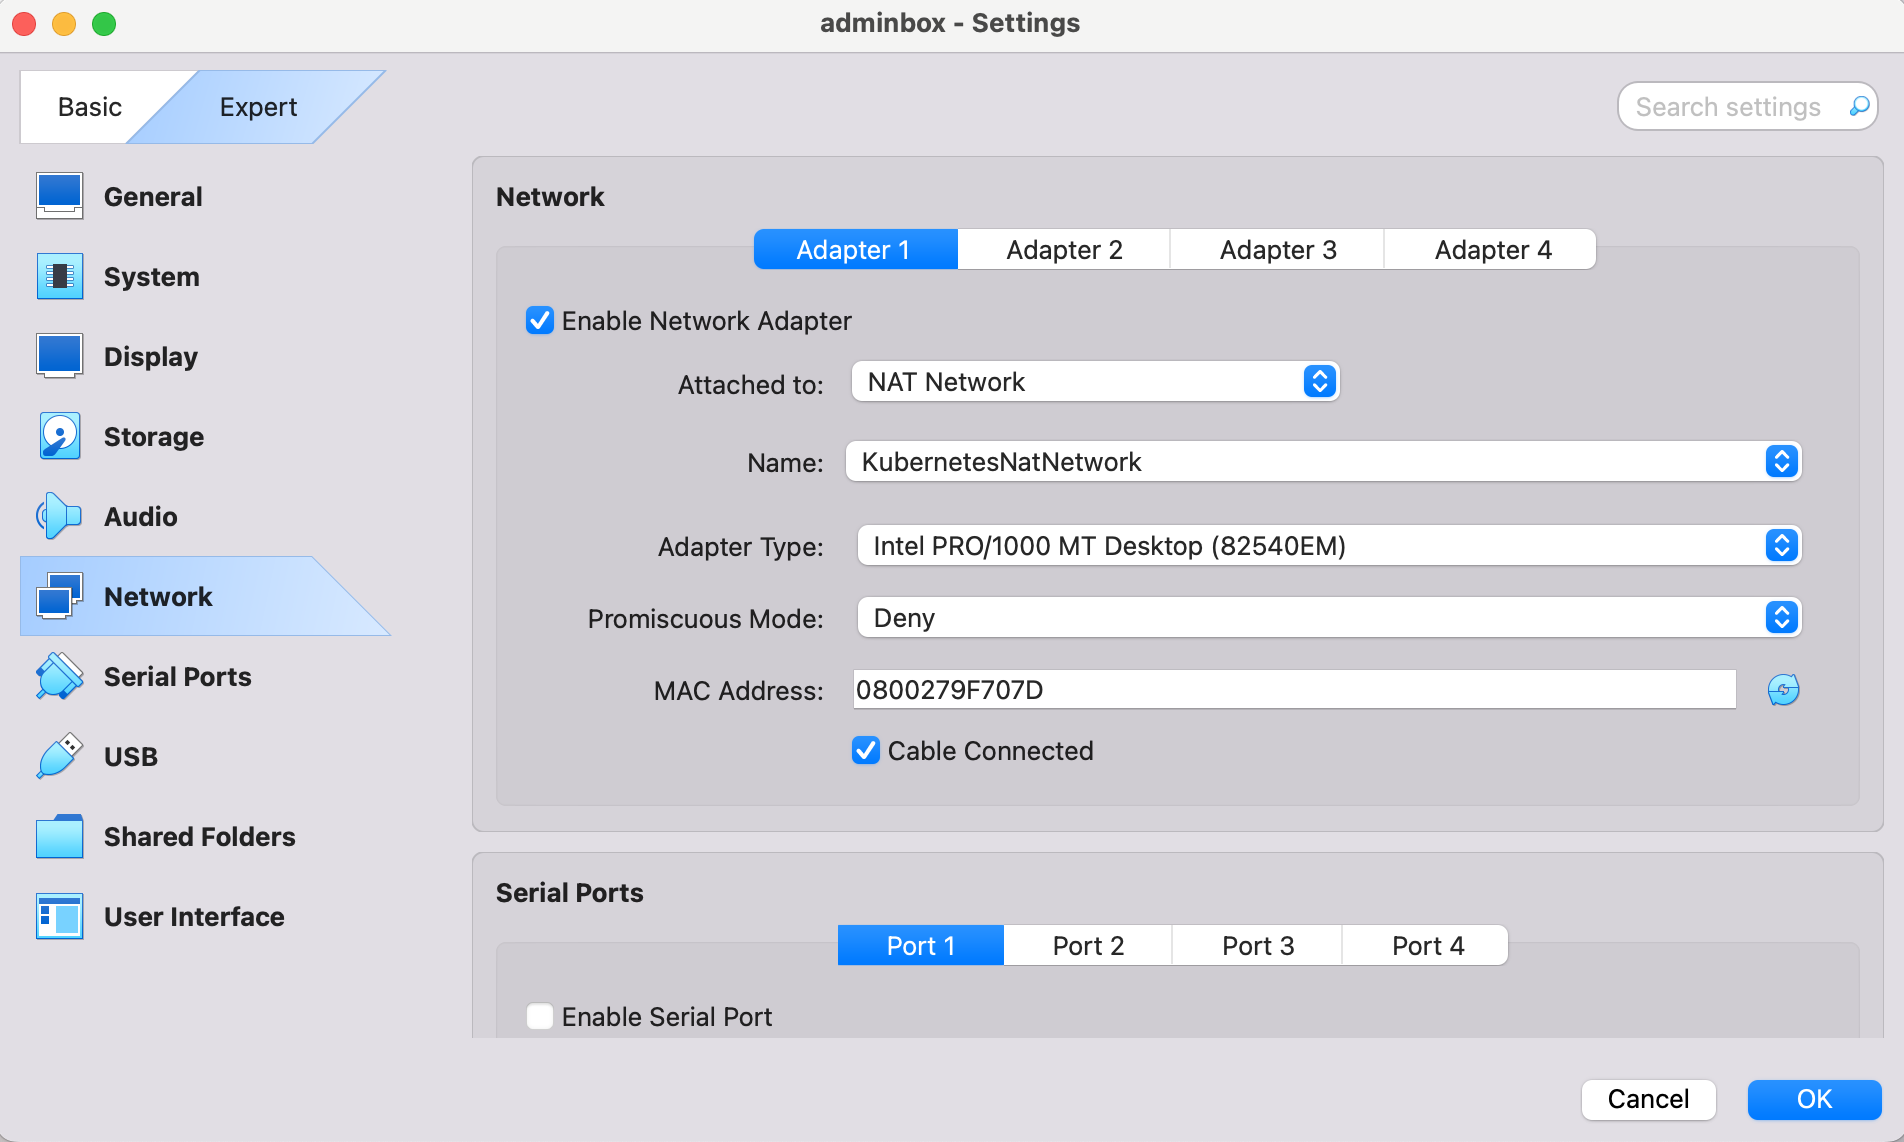
- Attached to: NAT Network
- Name:
KubernetesNatNetwork
Then select Settings > Network > Adapter 2, depending on how your laptop is connected to the internet, either via Wifi or Ethernet cable.
For Wifi:
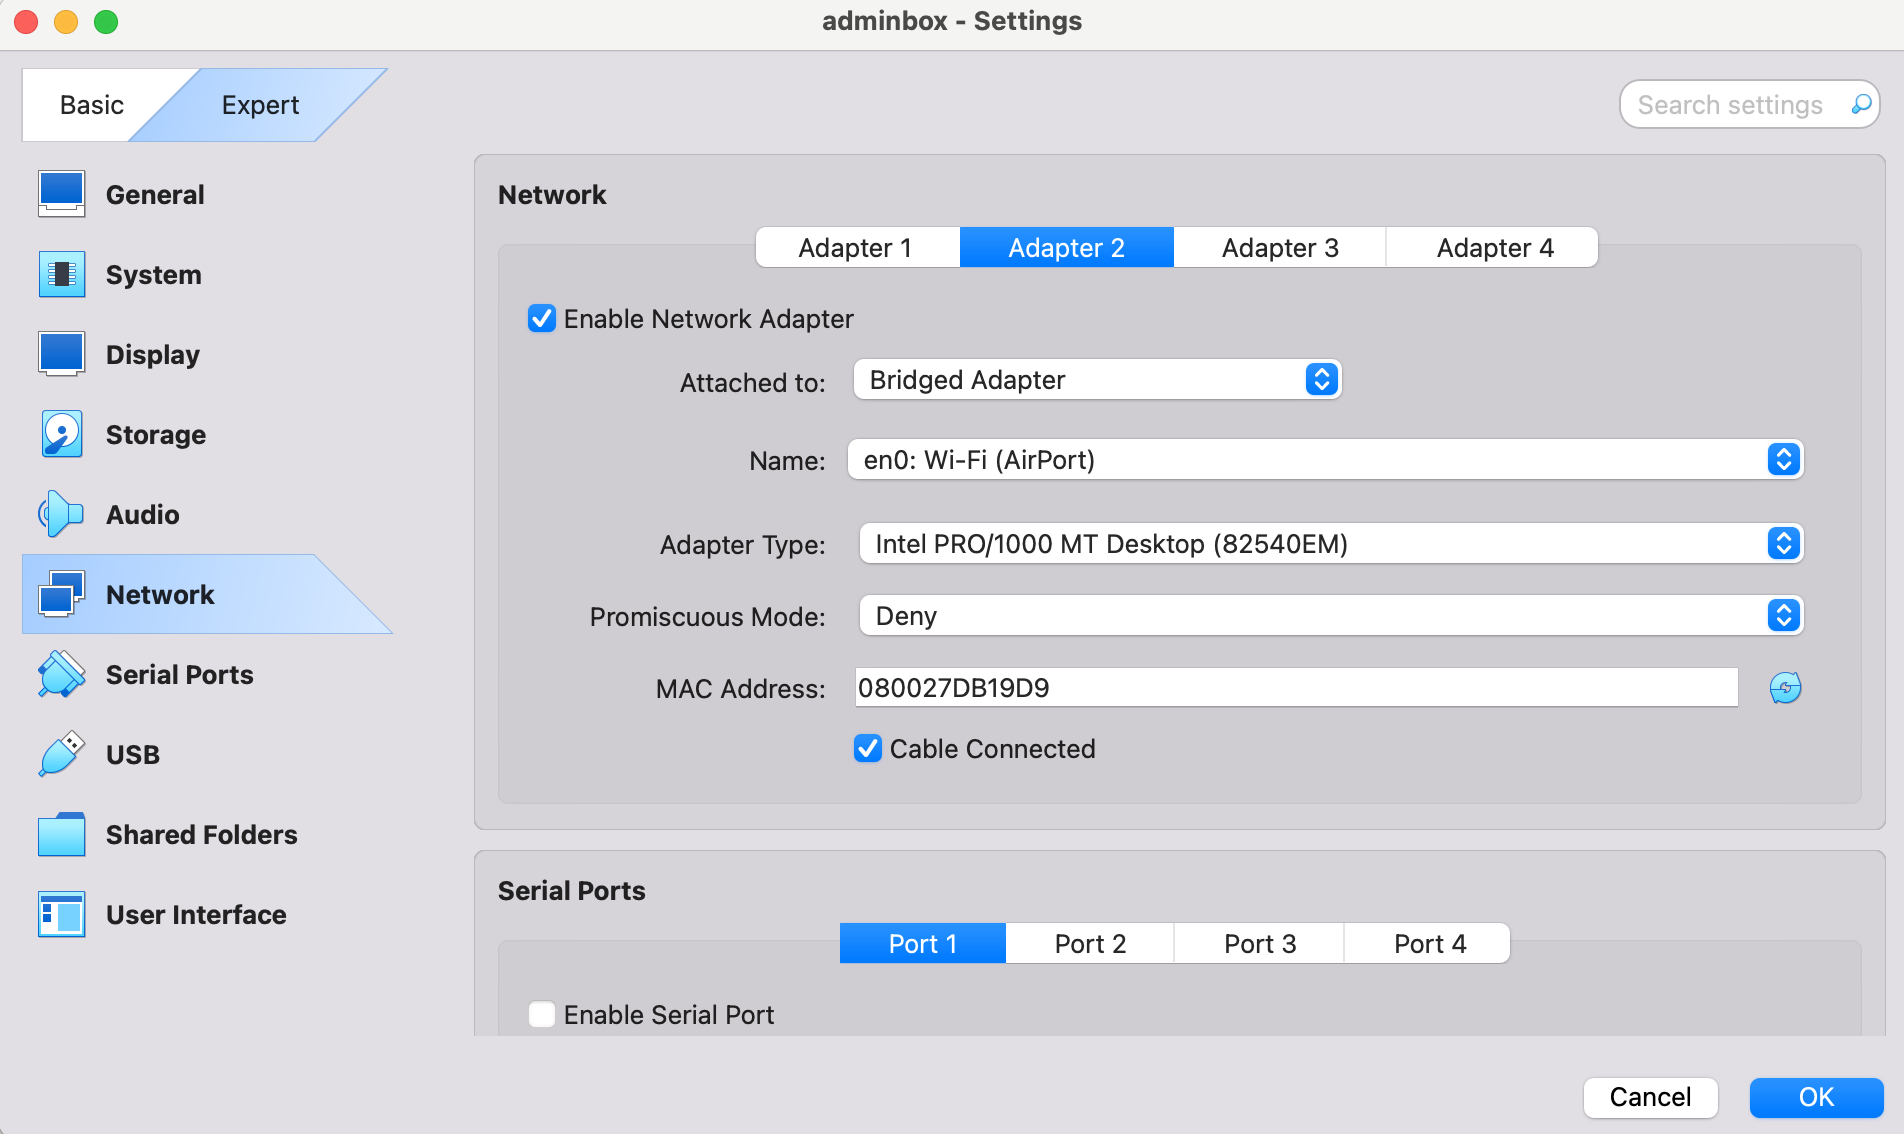
- Attached to: Bridged adapter
- Name: en0 (means the machine for me is gonna connect to the Wifi)
For Ethernet cable:
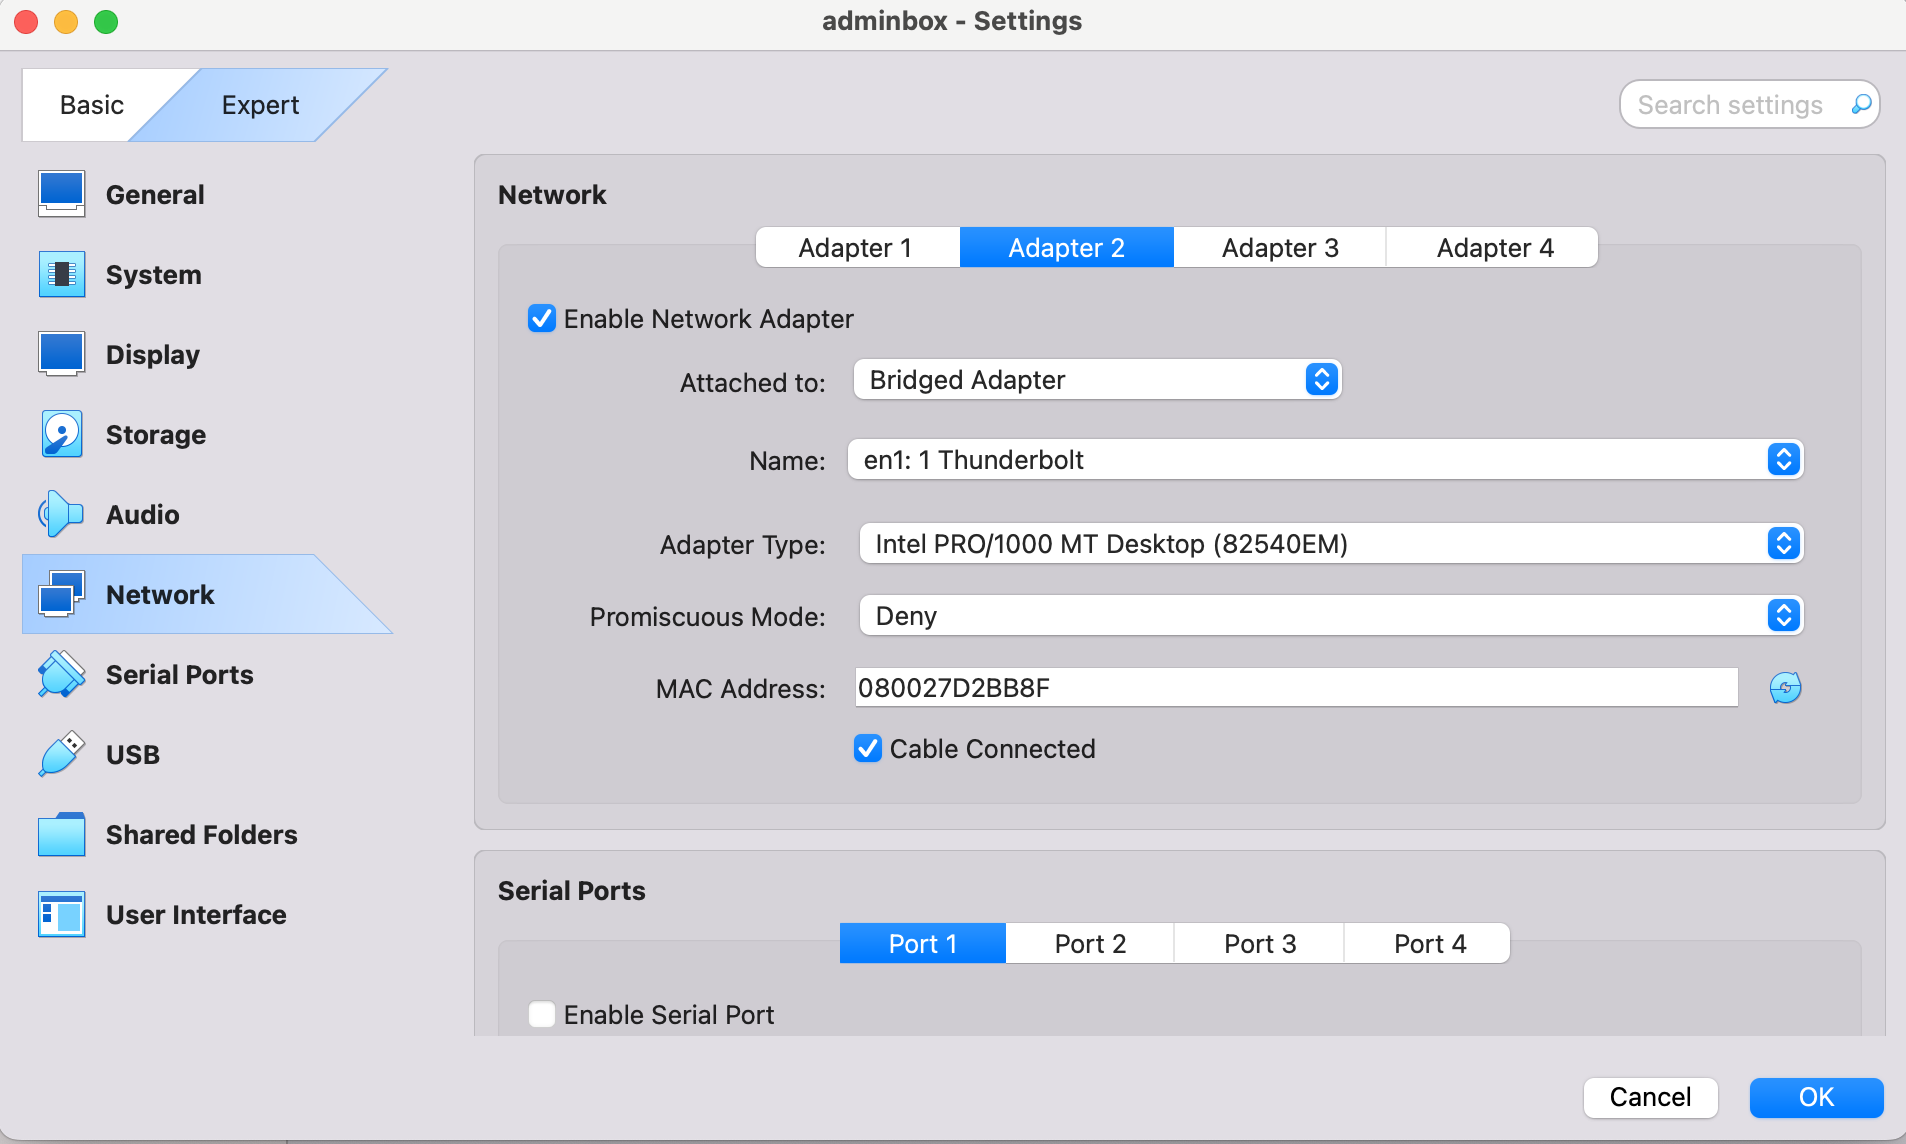
- Attached to: Bridged adapter
- Name: en1 (means the machine for me is gonna connect to an Ethernet cable)
To understand all the possible bridged connections on your computer follow this link.
Install Ubuntu
For each machine (ctrlplane, node1 & node2) I will install Ubuntu 24.04 LTS.
-
Power on all the machines in a row :)
-
Select the language: English
-
Choose whether to update to the new installer or not (I don’t)
-
Select the keyboard layout
-
Choose the base for the installation: Ubuntu Server
-
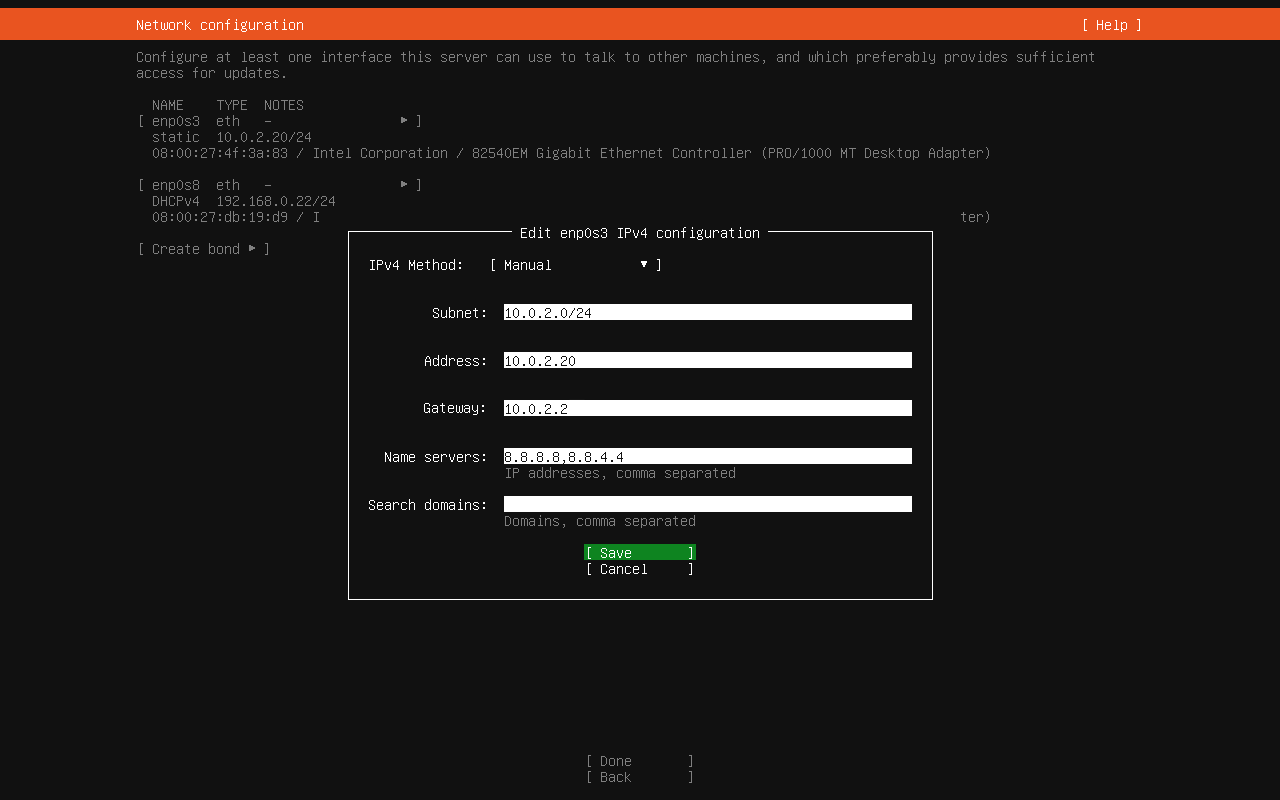
The ethernet adapter enp0s3, we’ll want to set a static IP for. You can complete this now or later. To do now continue as follows
- Edit IPv4 > Manual
- Subnet: 10.0.2.0/24
- Address: 10.0.2.20 for
ctrlplane, 10.0.2.21 fornode1& 10.0.2.22 fornode2 - Gateway: 10.0.2.2 The default address of the virtual DHCP server used in the NAT mode is 10.0.2.2 for VirtualBox (this is also the IP address of the default gateway for a VM).
- Name servers: 8.8.8.8,8.8.4.4 The nameservers key specifies the DNS servers to be used by the system, these are the Google’s DNS servers as the primary and secondary DNS servers, respectively
- Search Domains: Leave blank
- Leave the proxy address blank
- Leave the Mirror address as is
- Select to use the entire disk and confirm to contine the install process
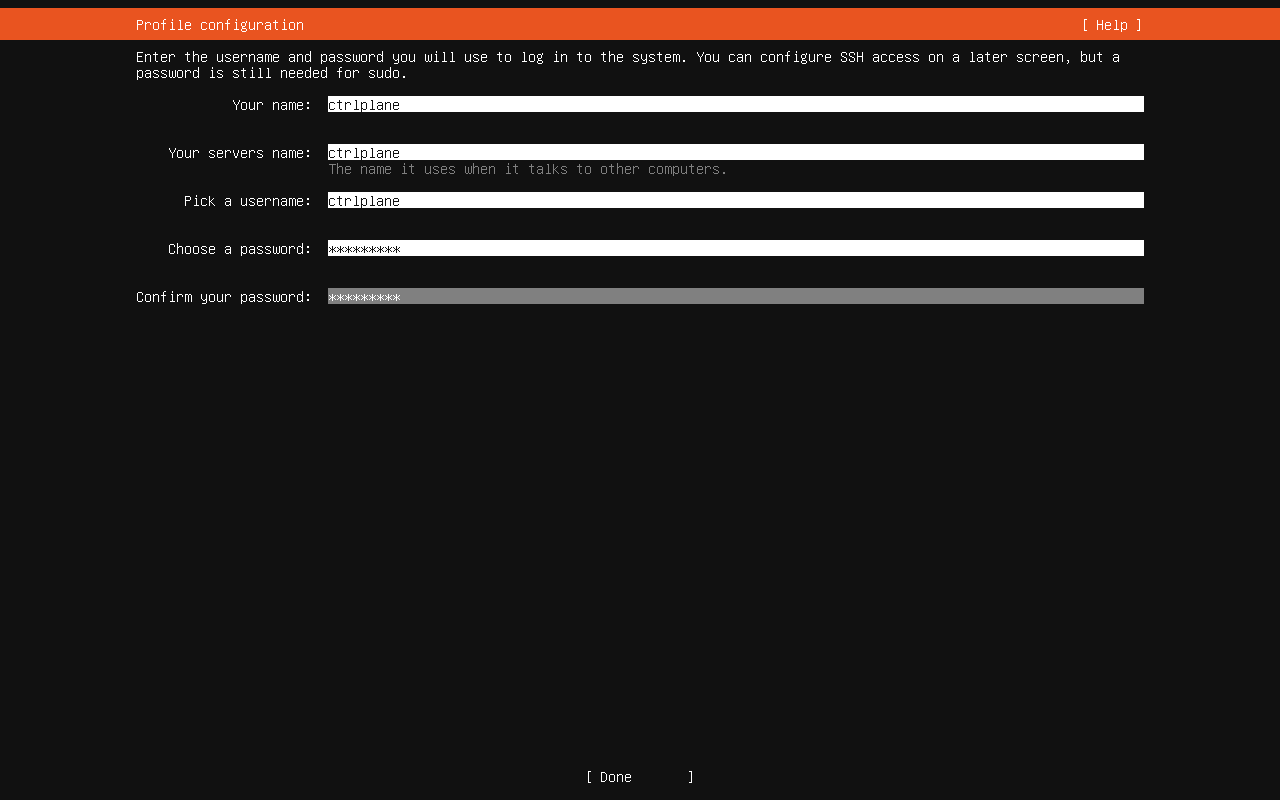
For each machine (ctrlplane, node1 & node2) I am gonna use the machine’s name in all the fields, because I am just doing a lab environment:
- Your name:
ctrlplaneandnode1andnode2 - Your servers name:
ctrlplaneandnode1andnode2 - Pick a username:
ctrlplaneandnode1andnode2 - Choose a password:
ctrlplaneandnode1andnode2 - Confirm your password:
ctrlplaneandnode1andnode2
Complete the setup:
- Upgrade to Ubuntu Pro: Skip for now
- SSH Configuration: Select Install OpenSSH server
- Do not select any other Feature Server Snaps
- Reboot now once complete
Note: You may want to shutdown the server upon first boot due to unmount /cdrom errors.
Update Ubuntu
Once you have booted up and logged into Ubuntu for the first time, update it as follows:
sudo apt update && sudo apt install -y
Get the ip address inet in enp0s8 position, remember this is the Bridged adapters we have set in Virtualbox.
ip addr show
1: lo: <LOOPBACK,UP,LOWER_UP> mtu 65536 qdisc noqueue state UNKNOWN group default qlen 1000
    link/loopback 00:00:00:00:00:00 brd 00:00:00:00:00:00
    inet 127.0.0.1/8 scope host lo
       valid_lft forever preferred_lft forever
    inet6 ::1/128 scope host noprefixroute
       valid_lft forever preferred_lft forever
2: enp0s3: <BROADCAST,MULTICAST,UP,LOWER_UP> mtu 1500 qdisc pfifo_fast state UP group default qlen 1000
    link/ether 08:00:27:4f:3a:83 brd ff:ff:ff:ff:ff:ff
    inet 10.0.2.20/24 brd 10.0.2.255 scope global enp0s3
       valid_lft forever preferred_lft forever
    inet6 fe80::a00:27ff:fe4f:3a83/64 scope link
       valid_lft forever preferred_lft forever
3: enp0s8: <BROADCAST,MULTICAST,UP,LOWER_UP> mtu 1500 qdisc pfifo_fast state UP group default qlen 1000
    link/ether 08:00:27:db:19:d9 brd ff:ff:ff:ff:ff:ff
    inet 192.168.0.22/24 metric 100 brd 192.168.0.255 scope global dynamic enp0s8
       valid_lft 42435sec preferred_lft 42435sec
    inet6 2a01:e0a:3e0:7b20:a00:27ff:fedb:19d9/64 scope global dynamic mngtmpaddr noprefixroute
       valid_lft 86014sec preferred_lft 86014sec
    inet6 fe80::a00:27ff:fedb:19d9/64 scope link
       valid_lft forever preferred_lft forever
Set Static IP
If you skipped the part to configure the static IP in the setup, it can be done from within the Ubuntu terminal as follows:
sudo cat /etc/netplan/50-cloud-init.yaml
# This file is generated from information provided by the datasource.  Changes
# to it will not persist across an instance reboot.  To disable cloud-init's
# network configuration capabilities, write a file
# /etc/cloud/cloud.cfg.d/99-disable-network-config.cfg with the following:
# network: {config: disabled}
network:
    ethernets:
        enp0s3:
            addresses:
            - 10.0.2.20/24
            nameservers:
                addresses:
                - 8.8.8.8
                - 8.8.4.4
                search: []
            routes:
            -   to: default
                via: 10.0.2.2
        enp0s8:
            dhcp4: true
    version: 2
You can change it with vi, vim, or nano.
sudo vi /etc/netplan/50-cloud-init.yaml
Save and exit the text editor, then type the following to apply the changes:
sudo netplan apply
Generate a SSH Key Pair
If you don’t have an ssh public key on your local environment, you must generate one.
Look for a file finishing with .pub extension.
ls ~/.ssh
From the host OS, create the ssh key-pair as follows:
ssh-keygen -t ed25519 -C "your_email@example.com"
Press Enter to accept the key to be saved in ~/.ssh and do not specify a passphrase.
Connect with OpenSSH from you local environment
To enable us to easily access the ctrlplane from the host OS for system administration, we can easily setup a SSH key-pair as follows:
ssh-copy-id ctrlplane@192.168.0.22
/usr/bin/ssh-copy-id: INFO: Source of key(s) to be installed: "/Users/Thomas/.ssh/id_ed25519.pub"
The authenticity of host '192.168.0.22 (192.168.0.22)' can't be established.
ED25519 key fingerprint is SHA256:1ROG1dKUGQz5lKoS3J2/kuXsGHaUcJoUnF702uJpiQ4.
This key is not known by any other names
Are you sure you want to continue connecting (yes/no/[fingerprint])? yes
/usr/bin/ssh-copy-id: INFO: attempting to log in with the new key(s), to filter out any that are already installed
/usr/bin/ssh-copy-id: INFO: 1 key(s) remain to be installed -- if you are prompted now it is to install the new keys
ctrlplane@192.168.0.22's password:

Number of key(s) added:        1

Now try logging into the machine, with:   "ssh 'ctrlplane@192.168.0.22'"
and check to make sure that only the key(s) you wanted were added.
Get into the server with the inet ip address in enp0s8 position.
ssh ctrlplane@192.168.0.22
Add all the servers within the NAT Network.
sudo vi /etc/hosts
Add the following at the end of /etc/hosts.
# Cluster NAT Network
10.0.2.20   ctrlplane
10.0.2.21   node1
10.0.2.22   node2
Save this file and then go to the other servers into the NAT Network, and do the same with the following:
ssh node1@node1
echo -e "\n# Cluster NAT Network\n10.0.2.20   ctrlplane\n10.0.2.21   node1\n10.0.2.22   node2\n" | sudo tee -a /etc/hosts
exit
ssh node2@node2
echo -e "\n# Cluster NAT Network\n10.0.2.20   ctrlplane\n10.0.2.21   node1\n10.0.2.22   node2\n" | sudo tee -a /etc/hosts
exit
Finally exit from ctrlplane server, and power off the machine from Virtualbox.
Summary
We’ve now successfully built the ctrlplane, node1 & node2 servers in VirtualBox, have updated it and can SSH onto it. This will allow us access from the host machine, access to the internet, and access to future VMs created in the NAT network.
You can go now on my next post Install Kubernetes 1.32 and Calico 3.29 for networking on multiple instances